COMMON DT SETUP PROBLEMS
THE INFORMATION BELOW APPLIES TO EVERY TEXAS TIMER WITH A DT FUNCTION
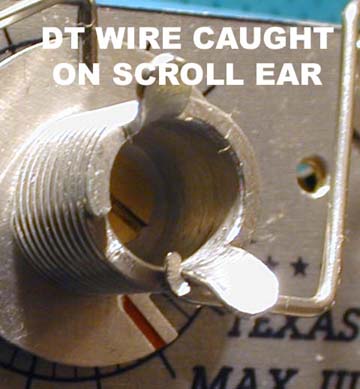
While at the 2004 NATS I had an opportunity to meet with a number of fliers who were complaining that the winding ears on the scroll were causing a failure to DT. They were showing me a situation like shown in the photo below. Their assumption was that the DT wire ridding on the scroll thread was hanging up on the ear as shown, and the stabilizer was not being released. On first reaction, this seems like a real timer problem, BUT IT IS NOT. Why? Because the instant the wire reaches the top of the scroll, tension on the DT line is suppose to cause the wire to jump up immediately, and the DT post on the faceplate lays down, releasing the DT line to the stabilizer. At this point, the timer is done with everything it is supposed to do, and if the wire falls back on the scroll and catches an ear, WHO CARES? It is just that much less winding to do for the next flight.
So what about the fact that the DT is not working on the plane? This is a real problem, and it needs to be understood as it is far more common than I thought. To understand this, look at the photos below. There is either a wire or a rubber band on the post, instead of the washer or split ring specified in the instructions. The use of these connection methods results in no or very low torque on the post and subsequently, the wire on the scroll does not lift up off the scroll to release the DT line. There is flat just not enough force available to lift the wire off the top of the scroll. The line is so low or has even slipped down to the lower bend. Note: This is not a function of how much tension there is on the DT line, but where the line is on the post.
This is the problem. The line on the DT post is
not providing enough
torque to lift the wire up and off the scroll to let the DT line
post lay down and release the line. It is caused by improper
connection of the line to the post. It is perfectly normal for this wire
to bounce back and end up like this AFTER the DT line has released.
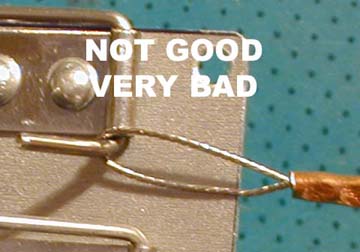 Here the wire loop can slide down so low it provides no torque to lift the scroll wire off the top of the scroll. It can also roll around the bend in the post wire. Never do this. |
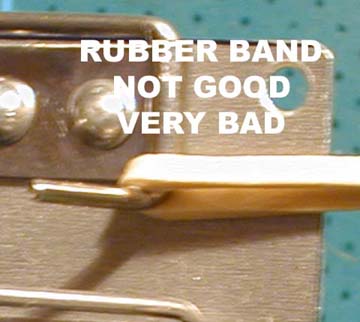 In this case the rubber band can stretch and slip down so low on the post that the DT will not release. It can even slip around the bend in the post wire. Never do this. |
SOLUTIONS
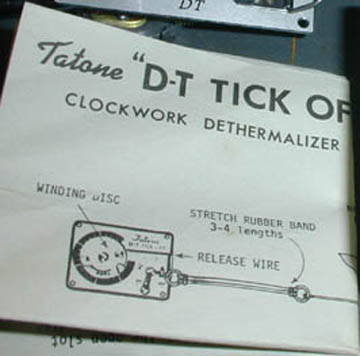
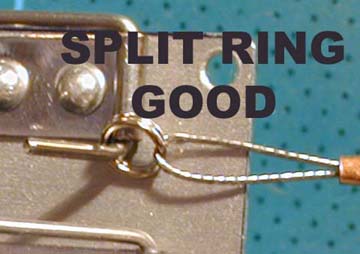
Tatone recognized the problem 40 years ago and shows the use of a ring on their DT post.
 |
 |
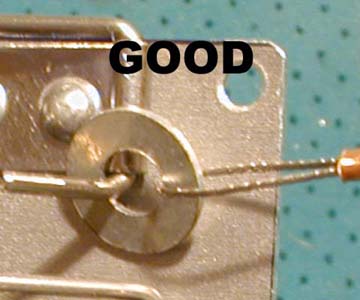 |
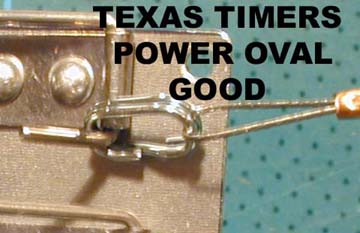
Any of the above three ways will provide a reliable way to connect the DT line to the timer. The photos below show other very effective ways others have addressed the problem and solved it. Whatever you do, be sure to test it thoroughly before flying.
The photos below show the correct way to attach the DT line to the DT post on all Texas Timers. The line must be somewhat low on the post, so DT tension does not over power the timer, or force the wire to come out of the scroll threads prematurely. DO NOT change the bend in the wire so it rides harder on the scroll. You will stop the timer from turning, or slow it so much that inconsistent times result. The solution I like best is the one where a 1/16 inch thick piece of ply, brass, or aluminum is glued as shown to the faceplate, forcing the DT line to ride above the bend, and preventing the ring from tilting and sliding down. The solution with the short tubing on the post will also work, but then you must be sure you line is riding right at the top of it, and not accidentally placed low.
Thanks to all my customers who unknowingly provided the models for these pictures.
|
|
The shim is placed so that there is no way the DT line can slip down and around the bend of the post. The DT works correctly every time. |
|
Here the engine and DT posts have a hard plastic collar slipped on them and the lines ride above the collars. Be careful as this can result in too much force being put on the timer if the collar is too thick (tall). I do not like the one on the engine post as our RPO has a lot of pull and this can really add drag on the timer. |
Here, the flyer has simply put a slice of fuel tubing on the post. Simple, yet effective. |
|
|
This is similar to the solution directly above. But, I feel the tubing is too thick and excessive force may be put on the timer if the DT line tension is very much. |
WHAT EVER YOU DO, PLEASE TEST IT OUT
THOROUGHLY TO BE SURE IT IS RELIABLE.
THERMALS AND HAPPY DT'ING
RETURN TO HINTS INDEX
![]()
 This
is a real interesting solution from
This
is a real interesting solution from