 |
 |
INSTALLATION AND SET UP OF THE RPO
Here is another description on how to do something from the skilled hands of Tandy Walker in Arlington, TX tandyw@flash.net . Tandy was asked by another flier for some guidelines on setting up our Remote Pinch Off (RPO). Tandy sent it to me, and I added a few extra suggestions. Although experienced fliers already have established their own way to do this, it is valuable information for an early stage entrant to free flight. The photos are courtesy of Tandy.
You asked: "How did you go about adjusting the cable from the timer to the RPO?"
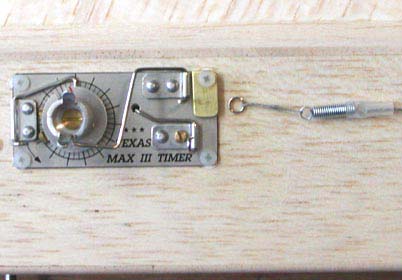
To begin with, I do not like to use the lug that comes with the RPO. In the left picture below, look at the little split ring on the opposite end of the DT spring. I suggest you order a few of these small split rings from Hank Nystrom. (Texas Timers) Now lets assume your engine and timer are mounted to the fuselage and the RPO has been drilled and bolted in place. Pull the RPO plunger back and slip the shank of an 1/8" drill bit into the hole of the RPO to hold it in the open position. Slip the supplied small copper tube onto the .015" braided cable and place the split ring on the bottom of the fuel shut off arm of the timer. The timer needs to be in the engine on position. Now run the cable through the split ring, pull it back against itself, thus bending the cable at exactly the right length. The cable needs to be tight with any slack removed, just so it starts to pull the plunger back more. Bend the cable to put a mark where the split ring is for a reference mark.
Unbolt and remove the RPO from the installation so you can work with it. With the split ring in place on the timer, slip the loose end of the cable back through the small copper tube and move the copper tube out to the end where the split ring is and as close to the ring as you can get it, thus forming a cable loop with the split ring trapped inside. Now, carefully crimp (or swage) the copper tube in place. The last step is to clip off the excess cable, leaving about a 1/16" length. Now reinstall the RPO. Slip the split ring over the fuel shut off arm of the timer and cock the timer. Remove the 1/8" drill bit from the hole of the RPO. At this point the plunger should be clear of the hole or only just showing. Then run your fuel line through the hole.
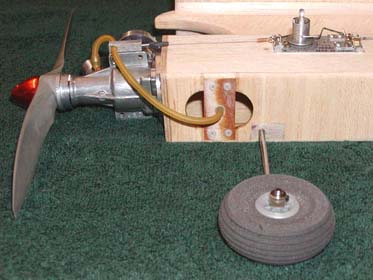
What you have should look similar to the right picture below. Now to test the installation. Blow through the fuel tube to be sure it is open. Fill your bladder with water and release the timer fuel shut off function to be sure the plunger completely shuts off the fuel. The cable will be a bit slack and the split ring retained in the "hook" at the end of the arm. You will be able to re-cock the RPO just by pushing the free end of the wire under the disk. Keeping the cable retained in the hook makes this pretty simple to do.
 |
 |